Table of Contents
- Azure Virtual Network Peering
- How to Create an Azure Virtual Network
- Virtual Network Peering
- How to Create a Virtual Network Peering
- Video Tutorial
Azure virtual network peering
A VPN gateway is a specific type of virtual networking gateway that is used to send encrypted traffic between an Azure Virtual Network and an on-premises location over the public internet. If a user desires to establish a secure connection between the cloud and on-premise location, a VPN is required.
To have a VPN connection between the virtual network and cloud, the user will be required to have a VPN gateway and the virtual network cloud. The user can establish the connection between the cloud and on-premises location using two ways, either through a VPN or through Express Route.
Express Route is expensive because it doesn’t use the public internet in order to establish the connection. VPN connection can be established as a Site to Site VPN or a Point to Point VPN.
How to create an azure virtual network
The first step is to log into the Azure portal and open the ‘Virtual Network’ tab and retrace steps by opening the subnets inside an existing virtual network. On the top of the screen, there will be an option called ‘Gateway Subnet’ which will have to be chosen by the user.
There are several requirements to be filled in while attempting to create a new gateway subnet such as –
- Name – The name of the gateway subnet can’t be changed and therefore it will always remain as the default ‘Gateway Subnet’ name throughout.
- Address Range
- Network Security Group
- Route Table
- Services Endpoints – This includes Services as well as the Subnet Delegations.
On completing the above task, the gateway subnet will be created once it has been approved by the user.
Virtual network peering
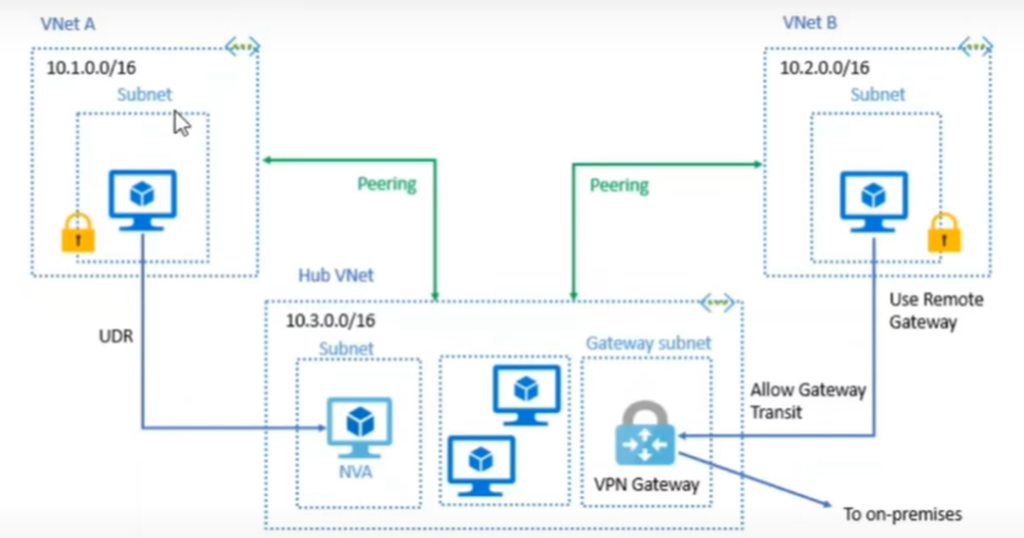
A Virtual Network Peering enables the user a seamless connection to the network. If there are two Virtual Networks called VNet A & VNet B respectively, the connection would be established between the two through the usage of Virtual Network Peering.
Virtual Network Peering will give a low latency and high bandwidth connection between the resources in the virtual networks. When using VNet Peering, the traffic between the two virtual machines will be Microsoft Azure Back Bone Infrastructure. This is used to guide the traffic between Virtual Network A & B.
Virtual Network Peering can be created within a region or on a global scale. Assuming that Virtual Network A is located in East USA and Virtual Network B is located in South East Asia or in some other region, then the user will need to choose a global virtual network peering.
How to create a virtual network peering
The first step is to log into the Azure portal.
The tab where the virtual networks had been created must be opened and if there is only one virtual network, another one must be created in order to create virtual network peering. The user must take care so as to not enter an IP Address that would clash with the previous virtual network that had been created. Once the second virtual network has been created, the first virtual network must be opened and the user must choose the option called ‘Peering’ which is located on the left hand side in the drop down menu.
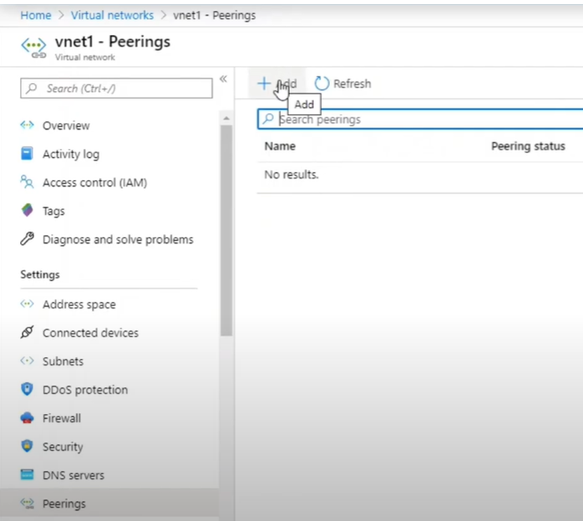

The user will be redirected to another page where the plus symbol at the top left corner of the screen must be chosen in order to create a new peering.
The following are the various types of information that will be required by the user to fill –
- Name – This is the name of the peering from the first virtual network to the remote virtual network.
- Peer Details – This refers to the virtual network deployment model which can either be Resource Manager / Classic.
- Subscription
- Virtual Network
- Name of the Peering from Virtual Network 2 to Virtual Network 1
- Configurations – Several configurations would have been enabled by default which will need to be adjusted according to the user’s requirements and needs which deal with options such as the allowance of virtual network access from VNet 1 to VNet 2, allowance of virtual network access from VNet 2 to VNet 1 and similarly with the case of forwarded traffic.
If the gateway transit is enabled, it will be peered with the VPN gateway.
Once the peering has been approved, there will be two deployments going on at the same time which will be for VNet 1 to peer in VNet 2 and the other one for VNet 2 to peer in VNet 1.
The results will take a while to be reflected on the screen. Once it has been done successfully, the peering status will be displayed as ‘Connected’ on the screen. The same will be displayed on the VNet 2 option. Now, the VNet 1 can communicate with VNet 2 and vice versa.
Video Tutorial